Data created in Micronet can be extracted from your Micronet data files and imported into other software packages, such as word processors and spreadsheets. Data can be exported in two ways:
To export data from your Micronet system using the export utility:
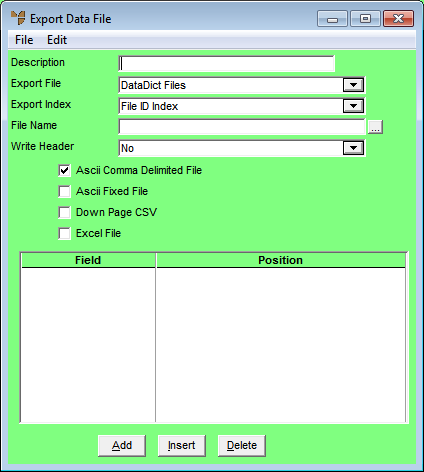
Micronet displays the Export Data File screen.
|
|
Field |
Value |
|---|---|---|
|
|
Description |
Enter a description for this data export. |
|
|
Export File |
Lists the names of all the files (and their corresponding indexes) that data may be extracted from to prepare a file for export. There are over 100 data files in the Micronet software suite. |
|
|
Export Index |
Lists the corresponding indexes. |
|
|
File Name |
Select the browse button (...) and select the location and name of the file in which the exported data should be saved. |
|
|
Write Header |
Select whether you want a header row in the exported file. Options are:
|
|
|
Ascii Comma Delimited File |
Check this box if you want the data exported as an ASCII comma delimited file, i.e. a standard text file where commas are used to separate fields. |
|
|
Ascii Fixed File |
Check this box if you want the data exported as an ASCII fixed file. This is where there are no delimiters between fields because each field is a fixed number of characters, e.g. Code is 25 characters and Description is 50 characters. |
|
|
Down Page CSV |
Check this box if you want the data exported as a down page CSV (comma separated variable) file. This is where the exported columns are written down the page instead of across. |
|
|
Excel File |
Check this box if you want the data exported as a Microsoft Excel file. This is a .xls file (not .xlsx). |
You can also select the individual fields you want exported using the fields and buttons at the bottom of the Export Data File screen.
|
|
|
Technical Tip You can add all fields in the file by selecting EDIT | ALL. if However, the file has a large number of fields, it could be slow to delete the fields you don't want. |
If you selected to add, insert or edit a field, Micronet displays the Enter Field screen.

|
|
Field |
Value |
|---|---|---|
|
|
Field |
Select the ID of the field you want included in the export. |
|
|
File Position |
Enter the position of the field in the exported file, e.g. 1, 2, 3, etc. |
|
|
Field Size |
Enter the maximum number of digits to be exported. |
|
|
Decimals |
|
Micronet redisplays the Enter Field screen so you can add further fields to your export.
Micronet redisplays the Export Data File screen.
The selected data is exported to a file named <filename>.TXT. For example, exporting the Debtor master file would create a filename called DEBTMAS.TXT.
Although Micronet software has correct file and record locking incorporated into the software, if other users have files and records open at the same time, Micronet returns a File Access Warning. To continue making your data export, your other operators must exit the Micronet system. These warnings do not corrupt the data but instead keep tight control over its integrity. The warnings are intended to inform you that someone else has currently got access to one or more of the records you wish to access. When a record access conflict like this occurs, the only option is to retry the action required, as indicated in the warning box.
When one or other of the users have completed the current operation, the other is allowed to continue. If both users wait, the machine access for both of the users stops. Continue to retry until processing for you continues. Do not power off or reset the computer as data corruption may occur.
